Face detection is a computer technology that is being applied for many different applications that require the identification of human faces in digital images or video.
It can be regarded as a specific case of object-class detection, where the task is to find the locations and sizes of all objects in an image that belongs to a given class. The technology is able to detect frontal or near-frontal faces in a photo, regardless of orientation, lighting conditions or skin color.

Not Face Recognition! It’s about Detection.
Using a certain algorithm to detecting human faces within an Image (Detect Human Faces on Farm full with Moo Moos 🐮 ) That’s when you use Face Detection. On the flip side, Face recognition describes a biometric technology that goes way beyond recognizing when a human face is present. It actually attempts to establish whose face it is. In this article, I’m not going deep into recognizing. I’ll keep that for a future blog article and for the time being, I’m going to explain how to run a simple Face Detection program using your WebCam with Python.
We’d dealt with two files at the end of this article.
- haarcascade_frontalface_default.xml ( Basics of face detection using Haar Feature-based Cascade Classifiers)
- FaceDetection.py (Python Script)
What is Haar Cascades?
Object Detection using Haar feature-based cascade classifiers is an effective object detection method proposed by Paul Viola and Michael Jones in their paper, “Rapid Object Detection using a Boosted Cascade of Simple Features” in 2001.
I recommend you to save that Pdf and read it when you have a chance if you plan to stay in this face detection/recognition plus machine learning rock star! In this paper, they have introduced the concept of Cascade of Classifiers. Haar-cascade Detection in OpenCV
Haar-cascade Detection in OpenCV
OpenCV comes with a trainer as well as a detector. If you want to train your own classifier for any object like a car, planes, etc. you can use OpenCV to create one. Its full details are given here: Cascade Classifier Training.
Here we will deal with detection. OpenCV already contains many pre-trained classifiers for face, eyes, smile, etc. Those XML files are stored in opencv/data/haarcascades/ Folder. Let’s create a face detector with OpenCV.
Let’s CODE!
First, we need to load the required XML classifiers.
import cv2faceCascade = cv2.CascadeClassifier('haarcascade_frontalface_default.xml')This loads the face cascade into memory so it’s ready for use. Remember, the cascade is just an XML file that contains the data to detect faces.
video_capture = cv2.VideoCapture(0)This line sets the video source to the default webcam, which OpenCV can easily capture.
while True:
    #Capture frame-by-frame
    ret, frame = video_capture.read()
In here, We’re capturing the video. The read() method reads one frame from the video source which is the Webcam and it returns:
- The actual video frame read (one frame on each loop)
- A return code
If we run out of frames by any chance, The return code will tell us but in our scenario, We are not reading from a file it’s our own Webcam so there’s no possibility for us to run of out of frames.
gray = cv2.cvtColor(frame, cv2.COLOR_BGR2GRAY)We just converted our Webcam feed to Grayscale. ( Most of the operations in OpenCV are done in grayscale.)
Now we’re kicking the jackpot bucket!
faces = faceCascade.detectMultiScale(
        gray,
        scaleFactor=1.5,
        minNeighbors=5,
        minSize=(30, 30),
        flags=cv2.CASCADE_SCALE_IMAGE
    )
Here’s when our code detects faces in our frame. Let’s drill down from each of the above.
- The
detectMultiScalefunction is a general function that detects objects. It detects faces since we’re using it on the face cascade. - The first option is the grayscale image.
- The second is the
scaleFactor. Since some faces may be closer to the camera, they would appear bigger than the faces in the back. The scale factor compensates for this. (You can change it to 1.5) - The detection algorithm uses a moving window to detect objects.
minNeighborsdefines how many objects are detected near the current one before it declares the face found.minSize, meanwhile, gives the size of each window.
The function returns a list of rectangles in which it believes it found a face. Next, we will loop over where it thinks it found something.
for (x, y, w, h) in faces:
cv2.rectangle(frame, (x, y), (x+w, y+h), (0, 255, 0), 2)- This function returns 4 values: the
xandylocation of the rectangle, and the rectangle’s width and height (w,h). - We use these values to draw a rectangle using the built-in
rectangle()function.
cv2.imshow('FaceDetection', frame)This is the frame name (Kind of similar to the title of the Webcam popup)
> Now, I want to take a photo of my frame by Pressing the Space bar and I need to exit my program by clicking ‘ESC’.
#ESC Pressed
if k%256 == 27:
        break
#SPACE pressed
elif k%256 == 32:
img_name = "facedetect_webcam_{}.png".format(img_counter)
cv2.imwrite(img_name, frame)
print("{} written!".format(img_name))
img_counter += 1img_counter is a variable to count and increment after each photo was taken. We should declare this before declaring our While loop on the beginning (While=True)
To Clean everything up;
# When everything is done, release the capture
video_capture.release()
cv2.destroyAllWindows()
You can access the full code+XML file here.
Let’s do some Testing!!

I’m gonna move on to my Command Prompt (Or Terminal) run my script.

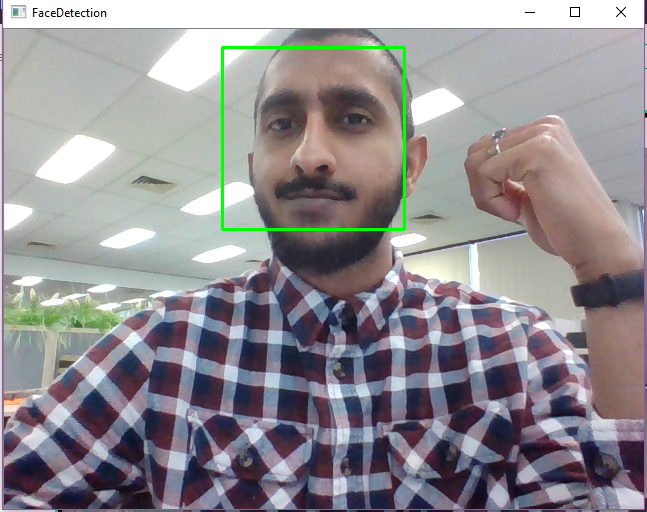
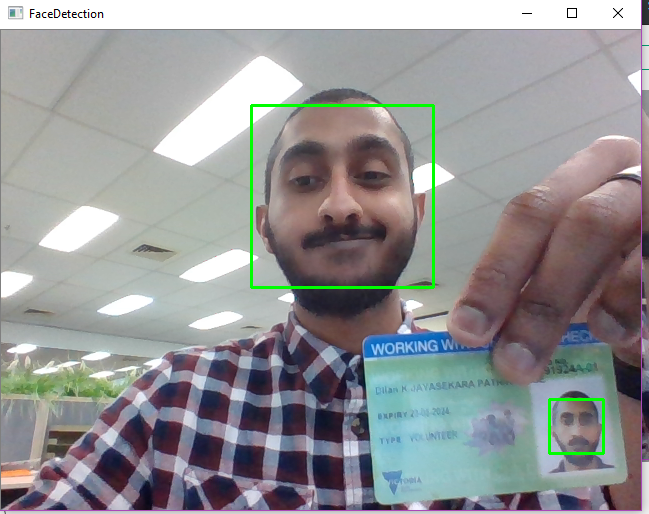
Running that Script gave mt this awesome Webcam feed and the good news it bloody recognized me!


You can see that the algorithm tracks both the real me and the photo me. Note that even when I move slowly and a bit higher rate, the algorithm can keep up. But if you wanna Usain Bolt it then the program will go super mad for sure I mean how could he right? We’re still getting there, The AI millennia. The code searches for the face frame by frame, so it will take a fair amount of processing power.
In my next article, I’ll explain how to detect your own face amongst many strangers/friends. For heads up, I’ll be sharing this example of machine learning techniques which I’m referring to recognize my own face in a group photo.
In the meantime, Check out this GitRepo which includes all available Haar classifiers for detecting various human body parts / Objects.
Keen on getting to know me and my work? Click here for more!
Thank you! Happy Detecting!
Click below for the next Article I penned right after this one.
In my previous article, I've talked about Face Detecting using Open CV with Haar Cascades. If you didn't have the…www.jayasekara.blog


1 Comments
I read your blog now share great information here.grayscale image converter
ReplyDelete