

I’m beginning to Fargate you.
We live 21st century now. We’re ready to say goodbye to Local server hostings and Virtual Machines. If you’re thinking why and confused, Keep reading!

Don’t let the image fool you: This is highly technical documentation.
Amazon Web Services
There are lots of stories about the formation of AWS, but this much we know: 10 years ago, Amazon Web Services, the cloud Infrastructure as a Service arm of Amazon.com, was launched with little fanfare as a side business for Amazon.com. Today, it’s a highly successful company in its own right, riding a remarkable $10 billion run rate.
Docker
The basic concept of containers was born back in 1979 with chroot UNIX, a system able to provide isolated spaces for the processes in the storage in use. Docker came to the theatre back in 2013 professionally.
Docker, the Linux container system most used in the IT field. Docker is an open-source project developed by the company Dotcloud (afterwards renamed Docker) on the basis of LXC, which through several advances becomes what is Docker technology now. Since 2014 Docker doesn’t use LXC as default execution environment anymore, replaced by its own Libcontainer library, based on the programming language GO. Docker is a complex but very intuitive ecosystem for the deployment and the management of containers, rich in functionalities including image system, local and global registries for containers and a command line interface.
Now, I don’t wanna repeat the same thing so If you haven’t read my previous post regarding AWS and Docker containers, Quickly go through the post and jump back here. (Link below)
What is Fargate?
AWS Fargate is a new compute engine for Amazon ECS that runs containers without requiring you to deploy or manage the underlying Amazon EC2 instances. With Fargate, you specify an image to deploy and the amount of CPU and memory it requires. Fargate handles the updating and securing of the underlying Linux OS, Docker daemon, and ECS agent as well as all the infrastructure capacity management and scaling.
How to use Fargate?
Fargate is exposed as a launch type for ECS. It uses an ECS task and service definition that is similar to the traditional EC2 launch mode, with a few minor differences. It is easy to move tasks and services back and forth between launch types. The differences include:
- Using the awsvpc network mode
- Specifying the CPU and memory requirements for the task in the definition
The best way to learn how to use Fargate is to walk through the process and see it in action.
TUTORIAL — NGINX

Step 1 — Create an ECS cluster
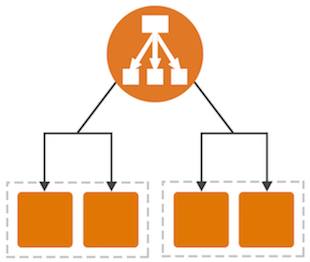
An ECS cluster is a logical construct for running groups of containers known as tasks. Clusters can also be used to segregate different environments or teams from each other. In the traditional EC2 launch mode, there are specific EC2 instances associated with and managed by each ECS cluster, but this is transparent to the customer with Fargate.
- Open the ECS console and ensure that Fargate is available in the selected Region (for example, N. Virginia).
- Choose Clusters, Create Cluster.
- Choose Networking only, Next step.
- For Cluster name, enter “Fargate”. If you don’t already have a VPC to use, select the Create VPC check box and accept the defaults as well. Choose Create.
Step 2 — Create a task definition, CloudWatch log group, and task execution role
A task is a collection of one or more containers that is the smallest deployable unit of your application. A task definition is a JSON document that serves as the blueprint for ECS to know how to deploy and run your tasks (Explained these in my previous article too).
The console makes it easier to create this definition by exposing all the parameters graphically. In addition, the console creates two dependencies:
- The Amazon CloudWatch log group to store the aggregated logs from the task
- The task execution IAM role that gives Fargate the permissions to run the task
- In the left navigation pane, choose Task Definitions, Create new task definition.
- Under Select launch type compatibility, choose FARGATE, Next step.
- For Task Definition Name, enter NGINX.
- If you had an IAM role for your task, you would enter it in Task Role but you don’t need one for this example.
- The Network Mode is automatically set to awsvpc for Fargate
- Under Task size, for Task memory, choose 0.5 GB. For Task CPU, enter 0.25.
- Choose Add container.
- For Container name, enter NGINX.
- For Image, put nginx:1.13.9-alpine.
- For Port mappings type 80 into Container port.
- Choose Add, Create.
Step 3 — Create an Application Load Balancer
Sending incoming traffic through a load balancer is often a key piece of making an application both scalable and highly available. It can balance the traffic between multiple tasks, as well as ensure that traffic is only sent to healthy tasks. You can have the service manage the addition or removal of tasks from an Application Load Balancer as they come and go but that must be specified when the service is created. It’s a dependency that you create first.
- Open the EC2 console.
- In the left navigation pane, choose Load Balancers, Create Load Balancer.
- Under Application Load Balancer, choose Create.
- For Name, put NGINX.
- Choose the appropriate VPC (10.0.0.0/16 if you let ECS create if for you).
- For Availability Zones, select both and choose Next: Configure Security Settings.
- Choose Next: Configure Security Groups.
- For Assign a security group, choose Create a new security group. Choose Next: Configure Routing.
- For Name, enter NGINX. For Target type, choose ip.
- Choose Next: Register Targets, Next: Review, Create.
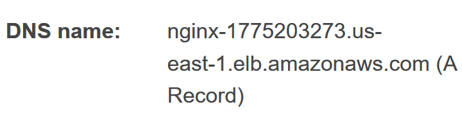
- Select the new load balancer and note its DNS name (this is the public address for the service).
Step 4 — Create an ECS service using Fargate
A service in ECS using Fargate serves a similar purpose to an Auto Scaling group in EC2. It ensures that the needed number of tasks are running both for scaling as well as spreading the tasks over multiple Availability Zones for high availability. A service creates and destroys tasks as part of its role and can optionally add or remove them from an Application Load Balancer as targets as it does so.
- Open the ECS console and ensure that that Fargate is available in the selected Region (for example, N. Virginia).
- In the left navigation pane, choose Task Definitions.
- Select the NGINX task definition that you created and choose Actions, Create Service.
- For Launch Type, select Fargate.
- For Service name, enter NGINX.
- For Number of tasks, enter 1.
- Choose Next step.
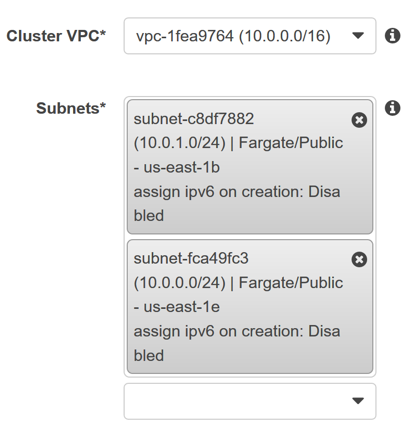
- Under Subnets, choose both of the options.
- For Load balancer type, choose Application Load Balancer. It should then default to the NGINX version that you created earlier.
- Choose Add to load balancer.
- For Target group name, choose NGINX.
- Under DNS records for service discovery, for TTL, enter 60.
- Click Next step, Next step, and Create Service.
Explore the running service
At this point, you have a running NGINX service using Fargate. You can now explore what you have running and how it works. You can also ask it to scale up to two tasks across two Availability Zones in the console.
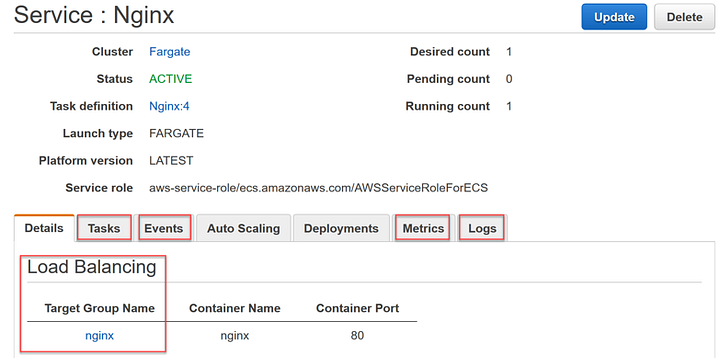
Go into the service and see details about the associated load balancer, tasks, events, metrics, and logs:
Scale the service from one task to multiple tasks:
- Choose Update.
- For Number of tasks, enter 2.
- Choose Next step, Next step, Next step then Update Service.
- Watch the event that is logged and the new additional task both appear.
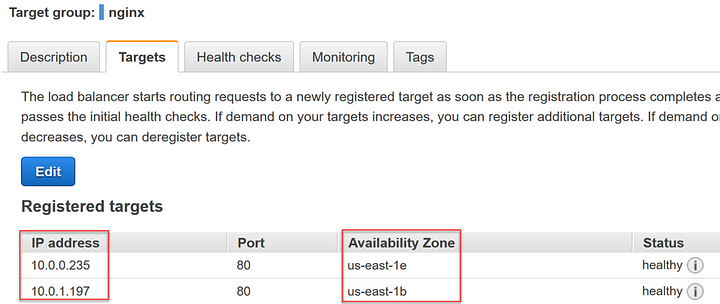
On the service Details tab, open the NGINX Target Group Name link and see the IP address registered targets spread across the two zones.
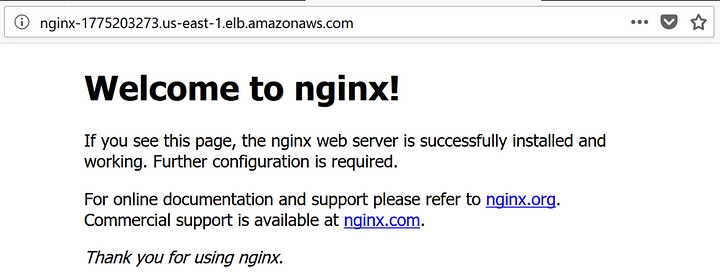
Go to the DNS name for the Application Load Balancer in your browser and see the default NGINX page. Get the value from the Load Balancers dashboard in the EC2 console.
Conclusion
As you’ve seen, Fargate is fast and easy to set up, integrates well with the rest of the AWS platform, and saves you from much of the heavy lifting of running containers reliably at scale.
While it is useful to go through creating things in the console to understand them better we suggest automating them with infrastructure-as-code patterns via things like Amazon Web Services CloudFormation to ensure that they are repeatable, and any changes can be managed. There are some example templates to help you get started in this post.
In addition, adding things like unit and integration testing, blue/green and/or manual approval gates into CodePipeline are often a good idea before deploying patterns like this to production in many organizations. Some additional examples to look at next include:
- https://github.com/aws-samples/ecs-blue-green-deployment
- https://github.com/aws-samples/codepipeline-nested-cfn


0 Comments