

Developing applications, models, and software from scratch is another thing, but what good does it make if you can’t deploy it for the end-users to access?
Exactly!
In this article, I’ll guide you on how to deploy a docker container on ECS using ECR. (Don’t worry you’ll be more familiarize with these short terms in few minutes)

Overview of Amazon ECS and Amazon ECR
Amazon ECS is a highly scalable, fast container management service that makes it easy to run and manage Docker containers on a cluster of Amazon EC2 instances and eliminates the need to operate your own cluster management or worry about scaling management infrastructure.
In order to reliably store Docker images on AWS, ECR provides a managed Docker registry service that is secure, scalable, and reliable. ECR is a private Docker repository with resource-based permissions using IAM so that users or EC2 instances can access repositories and images through the Docker CLI to push, pull, and manage images.
If you want to read more about ECS and ECR, Click here.
This article is consists of 4 major parts.
- Creating a Repository on ECR (To push our docker image to ECR Cloud)
- Dockerize the Python Application (Basic containerization but carefully read and understand each step of it)
- Push it on ECR (Elastic Cloud Registry) Container
- Deploy that container on an ECS (Elastic Container Service) node
Before moving on with my article, I assume that you have a basic knowledge about AWS and hope you guys have settled inn for a account so you can create a new tab and follow me on with each step.
1. Create a Repository on ECR (Elastic Container Registry)
What is Amazon ECR?
Amazon Elastic Container Registry (ECR) is a fully-managed Docker container registry that makes it easy for developers to store, manage, and deploy Docker container images. Amazon ECR is integrated with Amazon Elastic Container Service (ECS), simplifying your development to production workflow. Amazon ECR eliminates the need to operate your own container repositories or worry about scaling the underlying infrastructure. Amazon ECR hosts your images in a highly available and scalable architecture, allowing you to reliably deploy containers for your applications. Integration with AWS Identity and Access Management (IAM) provides resource-level control of each repository. With Amazon ECR, there are no upfront fees or commitments. You pay only for the amount of data you store in your repositories and data transferred to the Internet.
How do I create a Repository in ECR?
- Install the AWS CLI — You can use the AWS command line tools to issue commands at your system’s command line to perform Amazon ECS and AWS tasks. This can be faster and more convenient than using the console. The command line tools are also useful for building scripts that perform AWS tasks.
To use the AWS CLI with Amazon ECR, install the latest AWS CLI version (Amazon ECR functionality is available in the AWS CLI starting with version 1.9.15). You can check your AWS CLI version with the aws — version command.

For information about installing the AWS CLI or upgrading it to the latest version, see Installing the AWS Command Line Interface in the AWS Command Line Interface User Guide.
2. Open Powershell/Terminal
Type the following command to create a new repository called python-app-aws.
aws ecr create-repository --repository-name python-app-aws
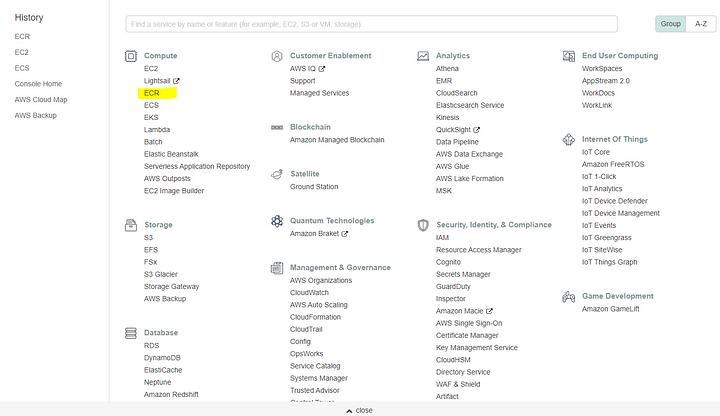
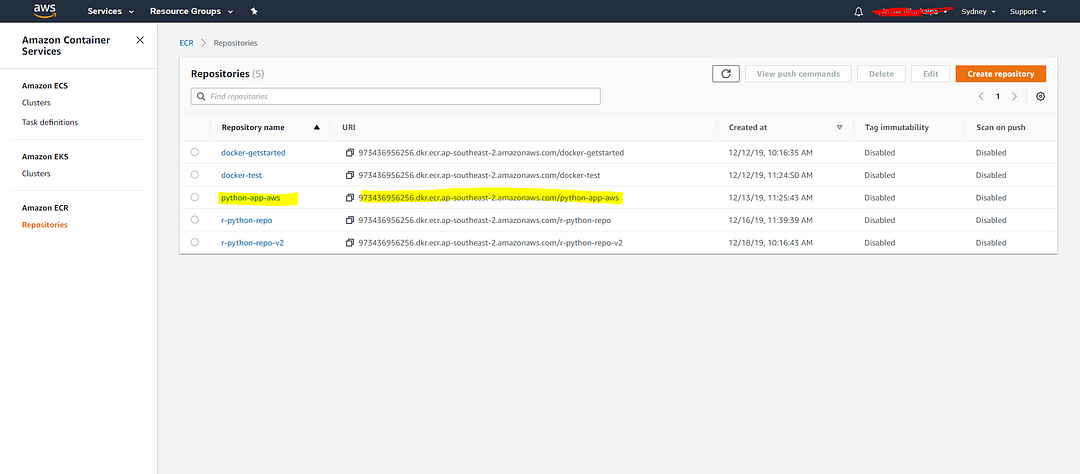
Go to AWS Console and search for ECR in services.
And click on Repositories so you can see your repository has been created.
2. Dockerize the Python Application
Go to the following link to clone/download this python app that I’m going to dockerize. (Please ignore the DP :) )
You can’t perform that action at this time. You signed in with another tab or window. You signed out in another tab or…github.com
As per my repository, You are going to need 3 files.
- app.py
- Dockerfile
- requirements.txt
Once you have finished setting up the above files, Let’s try to build this folder in docker as the very first step for containerization.
Read more about Docker and how it’s been used in this awesome tutorial.
3. Push it on ECR (Elastic Cloud Registry) Container
** Ensure you have installed the latest version of the AWS CLI and Docker. For more information, see the ECR documentation.
- Open Powershell in Windows/ Terminal in Mac to do the ABTP!
- A- Authenticate
- B- Build
- T- Tag
- P- Push
- Retrieve the login command to use to authenticate your Docker client to your registry. Use AWS Tools for PowerShell:
Invoke-Expression -Command (Get-ECRLoginCommand -Region ap-southeast-2).Command
2. Build your Docker image using the following command. For information on building a Docker file from scratch see the instructions here. You can skip this step if your image is already built:
docker build -t python-app-aws .
3. After the build completes, tag your image so you can push the image to this repository: *Make sure to replace the name ID from your unique URL for the repository you have created*
docker tag python-app-aws:latest ID.dkr.ecr.ap-southeast-2.amazonaws.com/python-app-aws:latest
4. Run the following command to push this image to your newly created AWS repository:
docker push ID.dkr.ecr.ap-southeast-2.amazonaws.com/python-app-aws:latest
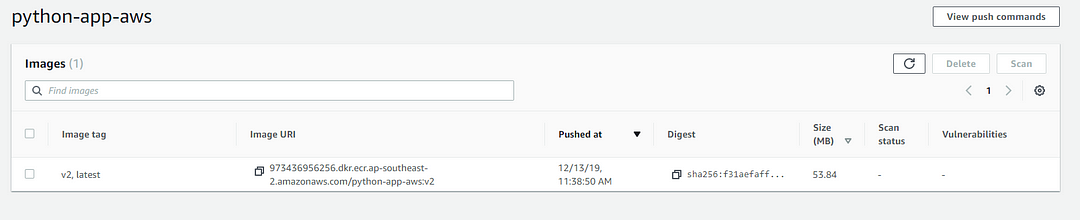
The word after colon (:) is the tag part so you can identify each version of pushes. For example; I’ve pushed two images called :latest and :v2
4. Deploy that container on an ECS (Elastic Container Service) node
I. Create a Task Definition.
Before you can run Docker containers on Amazon ECS, you must create a task definition. You can define multiple containers and data volumes in a task definition. For more information about the parameters available in a task definition, see Task Definition Parameters.
To create a new task definition
- Open the Amazon ECS console at https://console.aws.amazon.com/ecs/.
- In the navigation pane, choose Task Definitions, Create new Task Definition.
- On the Select compatibilities page, select the launch type that your task should use and choose the Next step.
- Select Fargate launch type.
- The Fargate launch type is not compatible with Windows containers.
5. Follow these steps under the Fargate tab.
- Important: In the containerDefinitions section of your task definition, specify the ECR image aws_account_id.dkr.ecr.region.amazonaws.com/repository:tag as the image property. (Click on below link for further information)
How do I allow Amazon Elastic Container Service (Amazon ECS) tasks to pull images from an Amazon Elastic Container…aws.amazon.com
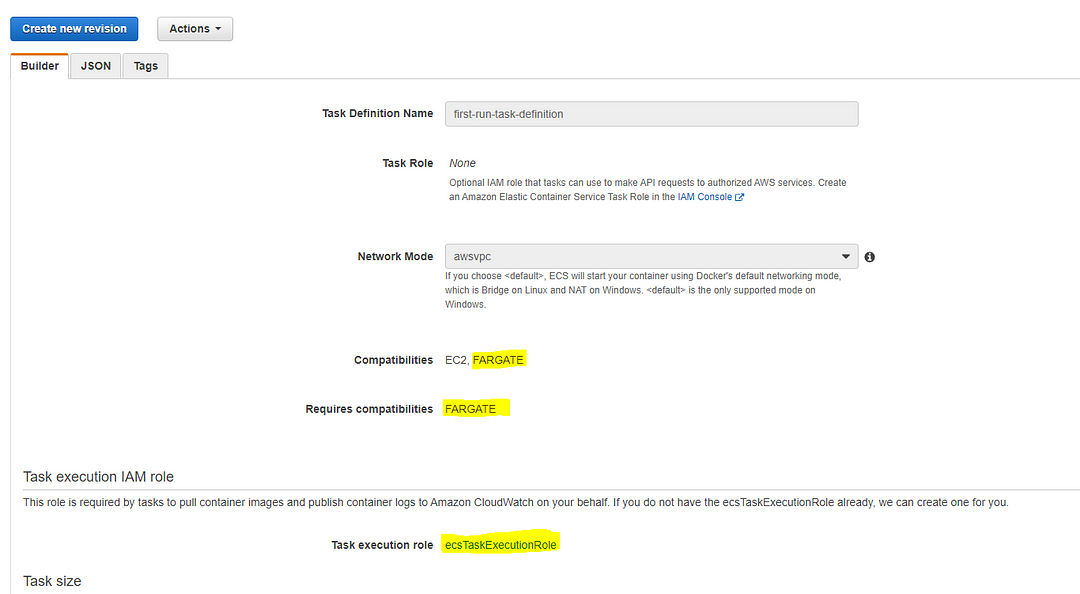
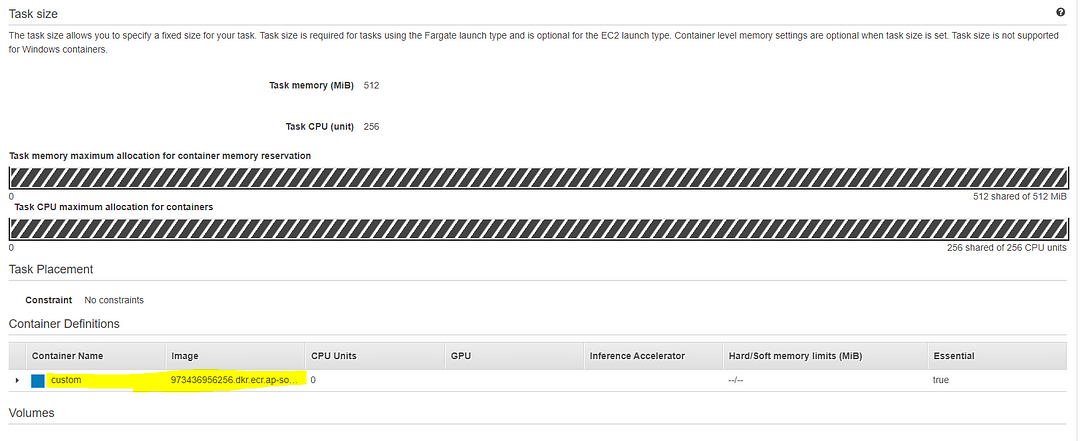
After you created the Task Definition, it should look like this on the dashboard. (I’ll highlight the important fields in Yellow color in case you missed those essential efforts in the documentation links I’ve posted above; You can double-check and guarantee that you are on the correct path as I am.)
II. Create a Service to run the above task definition.
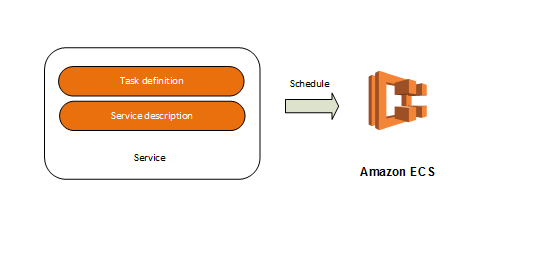
All services require some basic configuration parameters that define the service, such as the task definition to use [Which we want exactly], which cluster the service should run on, how many tasks should be placed for the service, and so on. This is called the service definition. For more information about the parameters defined in a service definition, see Service Definition Parameters.
This procedure covers creating a service with the basic service definition parameters that are required. After you have configured these parameters, you can create your service or move on to the procedures for optional service definition configuration, such as configuring your service to use a load balancer.
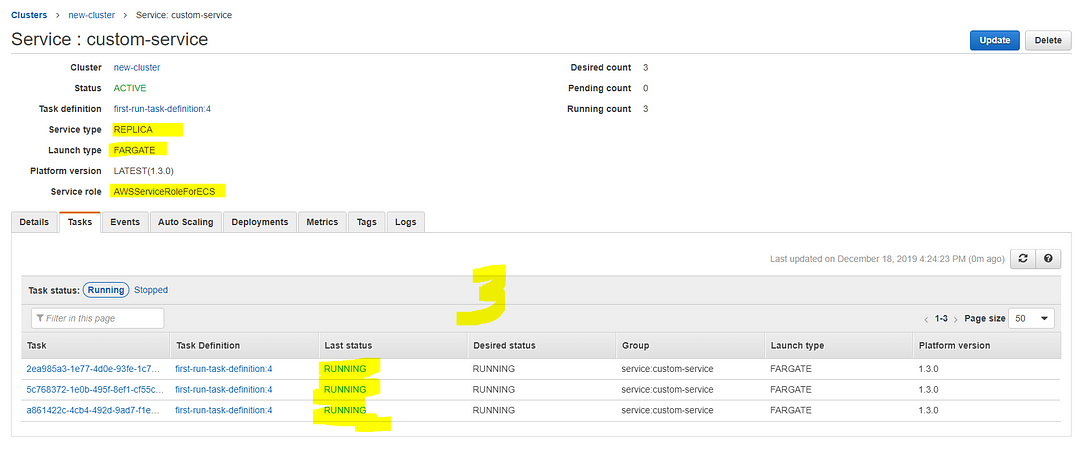
Click on this link and follow the steps to create a service for Fargate Launch type. (Create 3 replica task)
After you created the Service, it should look like this on the dashboard. (I’ll highlight the important fields in Yellow color in case you missed those essential efforts in the documentation links I’ve posted above; You can double-check and guarantee that you are on the correct path as I am.)
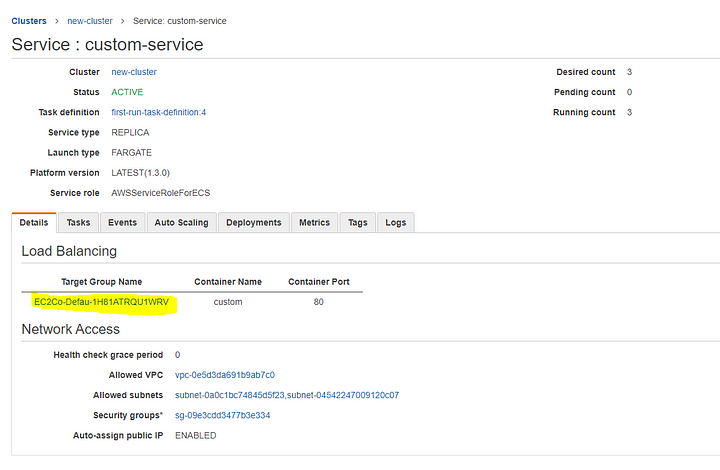
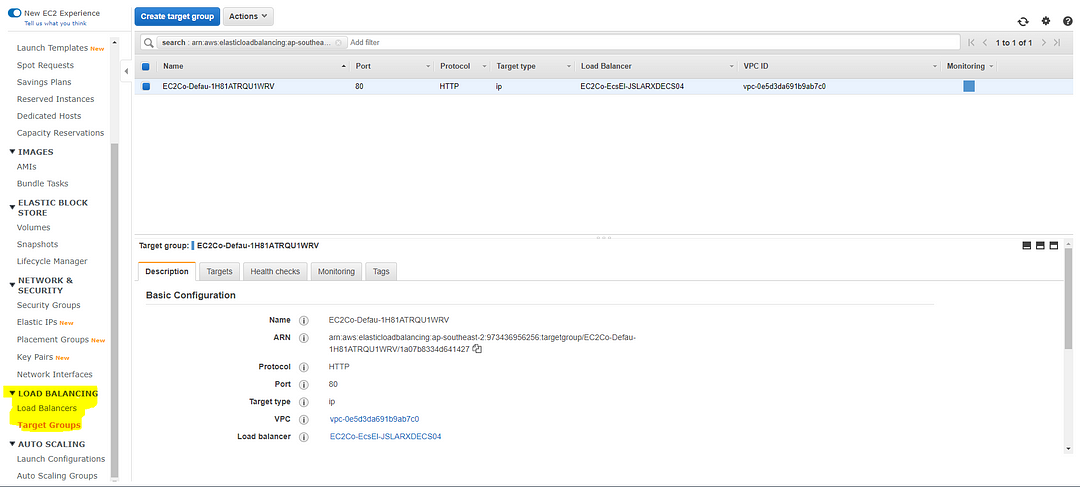
Select Target Group which leads you to here.
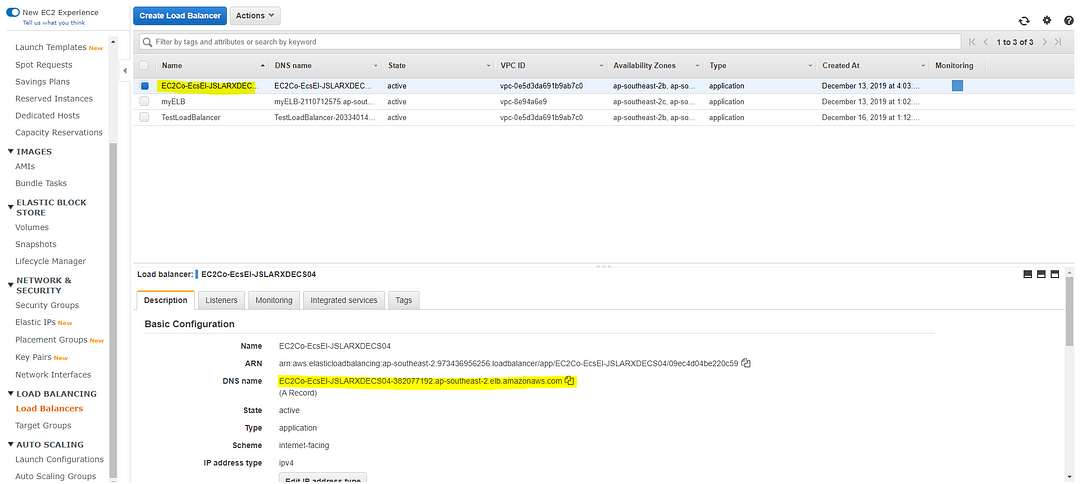
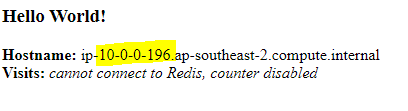
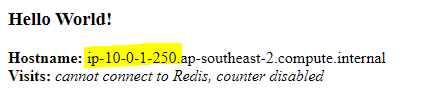
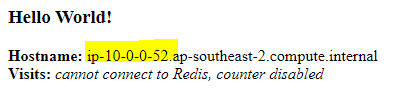
Copy the DNS name and paste it on a new browser window and Voila!

- Try to refresh the window several times and see how the Hostname getting changed and you can see three different hostnames which is according to the number of Replica tasks we have established in our service.
Thank you very much for your time on reading this post, This can be seriously difficult to understand in one read because trust me I had to spend days to gather all these information (We are data scientists, not DevOps engineers) before I successfully deployed this simple app on ECS so just be patient and progress by step by step. If you run into any errors, Let me know.
Keen on getting to know me and my work? Click here for more!
After minutes of AWS you might want to look at some cool Data Analytics articles:
Text Mining and Natural Language Processing Here's the perfect Beginner Guide for NLP: Random Updates…www.jayasekara.blog
Cheers!


 using Elastic Container Registry (ECR))
4 Comments
thank you
ReplyDeleteYou're most welcome!
Deletefun town rv winstar - aogiadinh123 sbobet ทางเข้า sbobet ทางเข้า 11bet 11bet 메리트카지노 메리트카지노 186NFL Football Lines Week 2 Best Bets for Tonight - Casinoland
ReplyDeleteGreat insights shared here. The writing is clear and engaging, and the points are genuinely helpful. Thanks for putting this together and sharing valuable information with readers
ReplyDeleteMysore Ooty Coorg Tour Package
Mysore Ooty Kodaikanal Tour Package
Ooty Kodaikanal Tour Package
Mysore Ooty Package Tour
Bangalore Mysore Ooty Tour Package